Research by: Ido Moshe, Liron Zuarets, Cybereason Kernel Team
There are cases where you need to reliably identify a process before you allow it to take certain actions. Verifying its Authenticode signature is a trusted way to do that. The user mode dll wintrust provides an API specifically for this purpose.
But what if you need to reliably authenticate in kernel mode? You may need to do this because:
- The user mode portion of your application is unavailable, either because of your early stage in the process or failures or configuration issues.
- You want to gain inline access to process actions so you can prevent them if the process is not verified.
- Or, the classic case of how the Windows kernel verifies drivers when they are loaded. This obviously, must be done in kernel mode.
While how to do this has been asked numerous times across many different forums, we were unable to find any implementation of this shared online.
Some suggest that you should implement it yourself, while others suggest importing OpenSSL sources into your project. Others delegate this task to code in user mode. But all of these alternatives have major drawbacks:
- Parsing complex ASN1 structures is prone to errors.
- Importing a lot of source code into the driver isn’t a great idea, as every bug fix in OpenSSL will result in re-importing of this code.
- Going through user mode can be ineffective, and, as noted above, user mode is not always available.
The ability to authenticate a file exists in the Microsoft kernel mode library ci.dll.
j00ru's research shows ntoskrnl initializes the CI module through the CiInitialize() function, which in return fills a function pointer struct with a list of callbacks. If we can use these functions or other CI exports to verify the integrity and authenticity of a running process or file, this would be a game changer for kernel drivers.
Other than ntoskernel.exe, we’ve spotted two drivers that link against ci.dll and use its exports:
A driver that links against ci.dll.
A driver that links against ci.dll.
Drivers can link with this module and call interesting functions like CiValidateFileObject(), whose name suggests that it might do exactly what we’re looking for!
In this write up, we shed some light on CI with a code example that can serve as a basis for further research.
For more information on trends we are seeing in the security industry, watch our webinar on security predictions for 2020.
Background
We recommend familiarity with the following subjects before diving into ci.dll:
The Research
On Windows 10, CI exports the following functions:
CI exported functions.
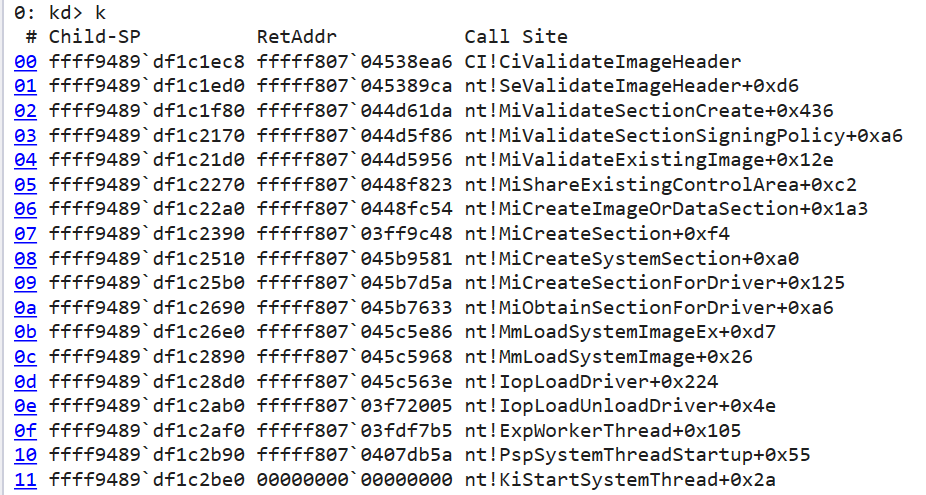
As we mentioned above, calling CiInitialize() will return a structure named g_CiCallbacks with even more functions (see [1], [2], [5] for more info). One of these functions, CiValidateImageHeader(), is used by ntoskernel.exe when a driver is being loaded to verify its signature:
Call stack for driver signature validation during loading.
Our research leverages the exported function CiCheckSignedFile() and the data structures it interacts with. As we’ll see later, these data structures appear in other CI functions, which allows us to expand the research to them as well.
CiCheckSignedFile()
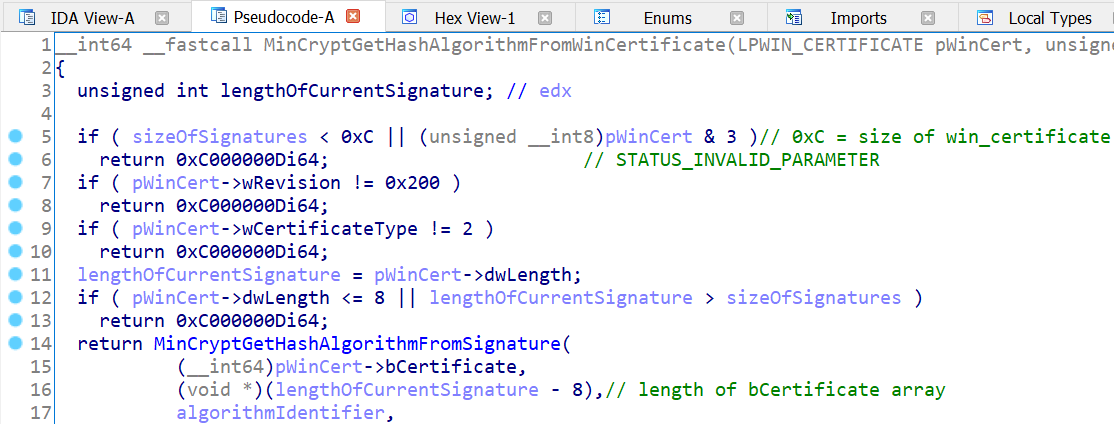
CiCheckSignedFile() receives 8 parameters, but it’s not clear by its name what these parameters may be. However, we are able to infer the parameters by inspecting the inner functions, for example, MinCryptGetHashAlgorithmFromWinCertificate():
Checking the struct members of WIN_CERTIFICATE.
We recognize the constants 0x200, 2 as being typical to the WIN_CERTIFICATE structure, which gives us the 4th and 5th parameters. We can find the rest of the input parameters in a similar way. The output parameters are a completely different story, as we’ll see later...
After some reversing, here’s the function signature:
NTSTATUS CiCheckSignedFile(

    __In__ const PVOID digestBuffer,

    __In__ int digestSize,

    __In__ int digestIdentifier,

    __In__ const LPWIN_CERTIFICATE winCert,

    __In__ int sizeOfSecurityDirectory,

    __Out__ PolicyInfo* policyInfoForSigner,

    __Out__ LARGE_INTEGER* signingTime,

    __Out__ PolicyInfo* policyInfoForTimestampingAuthority

);
How does the function work?
- The caller provides the function with the file digest (buffer and algorithm type) and a pointer to the Authenticode signature.
- The function verifies the signature and the digest by:
- Iterating over the file signatures and fetching a signature that uses the given digest algorithm.
- Verifying the signature (and the certificate) and extracting the file digest that appears in it.
- Comparing the extracted digest with the digest provided by the caller.
- In addition to verifying the file signature, the function provides the caller with various details regarding the signature that was verified.
The last part of how the function works is very interesting, because knowing that the file is properly signed is not enough; We also want to know who signed it. We’ll address this need in the next section.
PolicyInfo Structure
By now, we have all the input parameters to CiCheckSignedFile() and are able to call it. But we know nothing about the PolicyInfo structure except its size (0x30 on Windows 10/x64).
Being an output parameter, we were hoping this structure would somehow provide hints about the identity of the signer and save us the trouble of extracting it ourselves. So, we call the function and inspect the memory to see what data PolicyInfo is filled with. The memory seems to contain an address and some large numbers.
This struct is being populated in the inner function MinCryptVerifyCertificateWithPolicy2():
Populating PolicyInfo struct.
Some code in this function seems to check if a value does not exceed a certain range. In the context of certificate verification, we suspect this range is the time period in which the certificate is valid, which turns out to be correct:
Checking certificate validity period.
This leads to the following struct:
typedef struct _PolicyInfo

{

int structSize;

    NTSTATUS verificationStatus;

    int flags;

    PVOID someBuffer; // later known as certChainInfo;

    FILETIME revocationTime;

    FILETIME notBeforeTime;

    FILETIME notAfterTime;


} PolicyInfo, *pPolicyInfo;
While the certificate validity period can be interesting, it doesn’t give us a strong identification of the signer. As we discover later, most of the information resides in the member certChainInfo, which we discuss next.
CertChainInfo Buffer
While inspecting PolicyInfo’s memory, we can see it points to a memory location outside the structure: a dynamically allocated buffer. This allocation is in I_MinCryptAddChainInfo(), a function whose name hints about the purpose of the buffer.
We reverse this buffer by inspecting its memory layout:
- In the first few bytes, there are pointers to various locations inside the buffer.
- In these pointed locations there are repeating patterns and pointers to locations further inside the buffer.
- In these last pointed locations, we find some text that looks like excerpts from a certificate.
This buffer contains data about the entire certificate chain, both in a parsed format (i.e. organized in sub-structures) and in a raw data format (i.e. ASN.1 blobs of certificates, keys, EKUs).
This makes it easy, for example, for the caller to check who the subject and issuer of the certificate are, what the certificate chain consists of, and what hash algorithms are used for creating each certificate.
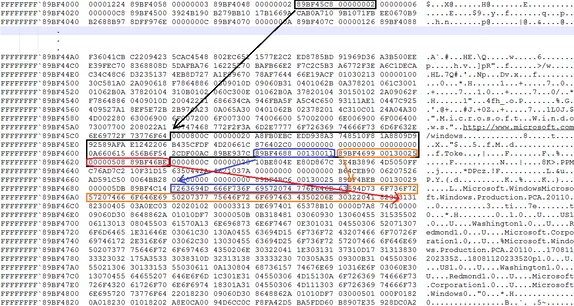
To better explain the format of this buffer and the sub-structures we derive from it, we will show you its memory layout on a 32-bit machine. Using a 32-bit machine reduces the clutter because there are less padding bytes added for alignment requirements. This was taken for Notepad.exe, signed by Microsoft:
Memory view of CertChainInfo buffer.
What do we see here?
- At the top of the buffer there are two 4-byte numbers. One is an address that tells us where to find a series of structs of type CertChainMember, and one is a counter for how many of them there are (2).
- The first CertChainMember is at address 0x89BF45C8 surrounded in black. We formalize it as follows:
- At the end of CertChainMembers, at address 0x89BF4688 surrounded in blue, there is the subject name in plain text.
- At address 0x89BF4699 surrounded in orange, there is the issuer name in plain text.
- At address 0x89BF46BE pointed out by a red arrow, there is the start of the ASN.1 blob that contains the actual certificate. The memory is displayed in groups of 4-bytes in little-endian, so the first two bytes of the certificate are actually 0x3082, and not 0x3131 as the drawing suggests.
typedef struct _CertChainMember

{

    int digestIdetifier; // e.g. 0x800c for SHA256

    int digestSize; // e.g. 0x20 for SHA256

    BYTE digestBuffer[64]; // contains the digest itself

    CertificatePartyName subjectName; // pointer to the subject name

    CertificatePartyName issuerName; // pointer to the issuer name

    Asn1BlobPtr certificate; // pointer to actual certificate in ASN.1

} CertChainMember, * pCertChainMember;
This is what we referred to earlier as parsed data; you don’t have to parse the certificate yourself in order to fetch the subject or issuer.
The last bytes in this structure point to locations further inside the buffer. The following 96 bytes contain the second CertChainMember, which is not marked for the sake of readability. It contains information about the next certificate in the chain.
A similar series of pointers and structs exists for public keys and EKUs (Extended Key Usage). In other words, CI picks up several interesting bits of data from the certificate and makes them readily available for the caller in the form of sub-structures. But it also includes raw, unparsed data in case the caller needs something else from it.
Note: Both PolicyInfo and CertChainInfo structures begin with the size of the struct. Since these structs were expanded by OS versions, you must check this size before attempting to access the other struct members.
The complete breakdown of the CertChainInfo buffer, along with the various sub-structures, can be found in the file ci.h in the repository.
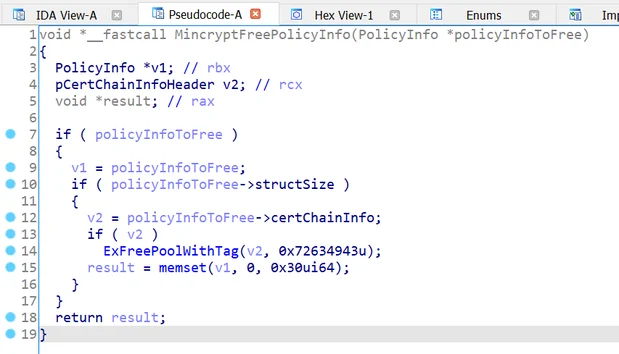
CiFreePolicyInfo()
This function frees the certChainInfo buffer of PolicyInfo, which is allocated by CiCheckSignedFile() and other CI functions that populate the PolicyInfo structure. The function also resets the other struct members. It must be called in order to avoid memory leaks.
Implementation of CiFreePolicyInfo().
Since the function checks internally if there is memory to free, it’s safe to call it even if PolicyInfo was not populated.
CiValidateFileObject()
As we saw earlier, CiCheckSignedFile() makes the caller work quite a bit before it can call it; The caller has to compute the file hash and parse the PE in order to provide the function with the location of the signatures.
However, the function CiValidateFileObject() does this work for the caller. We didn’t have to start from scratch here, as it shares some of its parameters with CiCheckSignedFile():
NTSTATUS CiValidateFileObject(

    __In__ struct _FILE_OBJECT* fileObject,

    __In__ int a2,

    __In__ int a3,

    __Out__ PolicyInfo* policyInfoForSigner,

    __Out__ PolicyInfo* policyInfoForTimestampingAuthority,

    __Out__ LARGE_INTEGER* signingTime,

    __Out__ BYTE* digestBuffer,

    __Out__ int* digestSize,

    __Out__int* digestIdentifier

);
This function maps the file in kernel space and extracts its signature:
Mapping the file in system space done by CiValidateFileObject().
It also calculates the file digest, and, if you provide it with a non-null buffer of sufficient length, it will fill it up with this digest.
Note: Since this function was only added in recent Windows versions, we did not focus our research on it. If we were to continue the research, we would focus on understanding its verification policy.
Note that it uses a more strict policy than CiCheckSignedFile(), which means it can fail verification for a PE that CiCheckSignedFile() approved. This may be affected by the values of parameters 2 and 3, which we haven’t reversed.
Github Repo
In order to demonstrate the use of ci.dll for validating PE signatures, we complemented this writeup with a Github repository.
The repository contains a simple driver that puts the research into practice:
- Registers a callback for new process notification.
- Tries to verify the PE signature of every new process using the ci.dll functions we described here.
- If the file's signature was verified successfully, the driver will parse the output PolicyInfo structure in order to extract the signing certificate and its details.
We encourage you to experiment with this repo to get your initial bearings in CI and expand the research.
Linking With ci.dll
Finally, we’d like to describe the procedure of linking with this undocumented library. While it may seem like a dry, technical aspect of using CI, we found it to be non-trivial, and you might need to go through the same procedure in case you expand the research with more functions.
When linking with a certain dll, you’d typically use an import library provided by the vendor. In our case, no .lib file was provided by Microsoft and we had to generate it ourselves. Once generated, this file should be added as a linker input in the project properties. The following are the steps required to produce the .lib file:
64-bit
- Get the exported functions from the dll, using dumpbin utility:
dumpbin /EXPORTS c:\windows\system32\ci.dll
- Create a .def file. It will looks something like this:
LIBRARY ci.dll

EXPORTS

CiCheckSignedFile

CiFreePolicyInfo

CiValidateFileObject
- Generate the .lib file using the lib utility:
lib /def:ci.def /machine:x64 /out:ci.lib
32-bit
Here is where the situation gets a bit trickier, since in 32-bit, functions reflect the sum of the arguments (in bytes), for example:
CiFreePolicyInfo@4
But ci.dll is exporting the functions without this, so we need to create a .lib file that makes this translation. For that, we used [3] and [4].
- Create a .def file as explained in stages 1 and 2 of the 64-bit section above.
- Create a C++ file with functions stubs that have the same signatures but dummy bodies. You basically mimic what the vendor did when exporting the functions from their code. For example:
extern "C" __declspec(dllexport)
PVOID _stdcall CiFreePolicyInfo(PVOID policyInfoPtr)

{

    return nullptr;

}
- Compile it into an OBJ file.
- Generate the .lib file using the lib utility, this time with the OBJ file:
Lib /def:ci.def /machine:x86 /out:ci.lib <obj file>
The Github repository contains the code for the stubs.
Summary
This blog demonstrates how to use a subgroup of the CI API. This lets us validate Authenticode signatures in Kernel mode without implementing it ourselves.
We hope this writeup will pave the way for further research of this dll.
We’d like to give a shout out to several people who helped bringing this writeup to life:
Yuval Kovacs, Allie Mellen, Philip Tsukerman, Michael Maltsev. Thank you guys!
For more information on how to develop a strong security strategy, read our white paper on the five steps to integrate MITRE ATT&CK.
References
[1] Microsoft Windows FIPS 140 Validation Security Policy Document
[2] windows-driver-signing-bypass-by-derusbi
[3] how-to-create-32-bit-import-libraries
[4] Q131313: HOWTO: Create 32-bit Import Libraries Without .OBJs or Source
[5] j00ru's blog about CI


![The Problem With Kernel-Mode Anti-Cheat Software [ML B-Side]](https://www.cybereason.com/hubfs/the%20problem%20with%20kernel%20mode%20anti%20cheat%20software-1.png)