Research by Amit Serper
As security professionals, we like analyzing the most advanced malware out there. Every time a security company publishes a report about an advanced, state-sponsored attack we all rush to read the report even if it’s only to find out that, yet again, even the most sophisticated attackers are executing all sorts of OS tools instead of using an API.
But the truth is you don’t have to be a tech-savvy nation-state hacker to create malware that works and gets the job done. A good example of a simple but effective program is the Fauxpersky malware, which was written with AutoHotKey, a benign tool used to automate tasks, and proved very effective at stealing credentials.
Contrary to what many people think, analyzing very sophisticated nation-state APTs (advanced persistent threats) is not how security researchers spend most of their time. In reality, we pass our days reviewing attacks that lack complexity (or “1337ness”, if you will) but still had an impact.
Now let’s change subjects and talk about .NET. Stay with me. The reason for this explanation will make sense soon. .NET is a programming framework introduced by Microsoft in the early 2000s with the goal of making programming easier. With .NET, gone were the days of allocating and freeing memory in C or writing very long and complicated code with C++ even if you were creating a simple program. The .NET languages, the most popular of them being C# (pronounced: C sharp), are modern, functional, generic, object oriented and have been described with every buzzword that’s applied to modern programming language. On the bottom line, C# makes developing programs for Windows (and for Linux and MacOS as well, using the mono framework) very easy; the syntax is very fluid, Visual Studio is very generous with its auto-completion and calling functions from the Windows API is very simple. In addition, when you compile your project, it will be compiled to an EXE or DLL (depending on the project, of course).
So you may be asking, “Wait, if it’s easier to program with .Net than C/C++ and I end up getting a binary PE after compilation, what’s the problem?” Well, the problem is that it’s not a real, native executable. Unlike an executable that was compiled from C/C++ code, when you look inside it, you won’t exactly find X86 assembly code because .NET works differently.
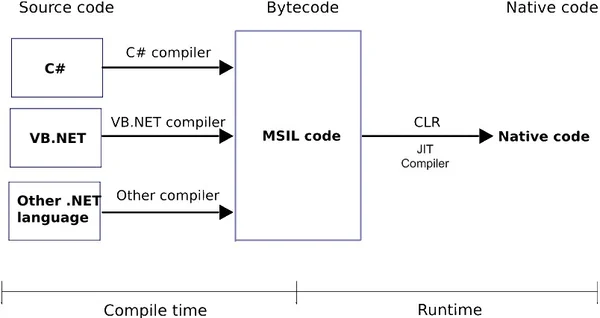
Image credit: http://www.developingthefuture.net/compilation-process-and-jit-compiler/
.NET Malware Dropper
When a .NET project is compiled, it is actually compiled into something called MSIL, or Microsoft Intermediate Language. The code is actually compiled when the program is being executed using a just-in-time compiler, or JIT. If you are interested in learning more about .NET compilation or runtime, please read Microsoft’s documentation about it. Think of MSIL as assembly, just on a higher level.
So why did I bore you to death with .NET compilation technicalities? To show the differences between an assembly of an executable that’s written in C or C++ versus one written in .NET. When we are reverse engineering a “normal” executable (such as one that was written with C or C++), the disassembler will show us x86/64 assembly, but with a .NET compiled executable, the “assembly” is there but it’s a different assembly. The fact that the code is compiled to MSIL means that inside that code is a lot of metadata that allows decompilation to be very easy. In fact, all you need is a .NET decompiler and some patience.
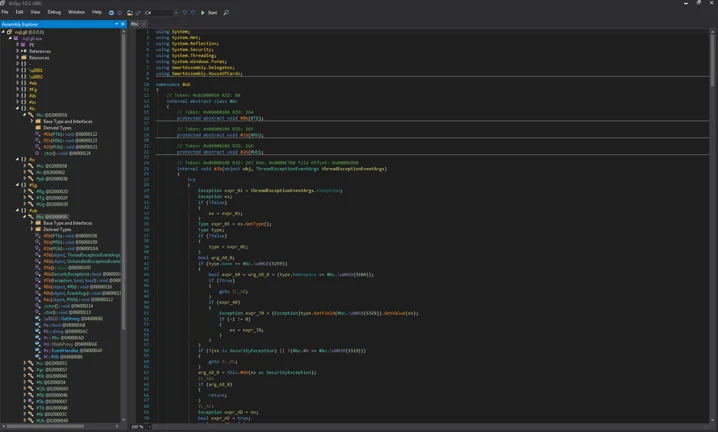
I recently came across some strange autoruns on machines that I used to test malware samples. I was very curious about how those autorun keys got there. When traced back all the file activities on the machine, I noticed that the patient zero was a specific malware sample I executed on the machine a few minutes before I saw the autoruns. When I looked at the original executable, I noticed that it was compiled from a .NET project, which means that we needed a completely different set of tools to examine it. Instead of using a proper disassembler like IDA pro, we need a .NET disassembler/decompiler. My favorite is dnSpy. It’s a great debugger and has a fantastic user interface since its based on another great project called ILSpy.
Using a decompiler like dnSpy lets you see the code, which is very close to the malware’s source (some variables, objects and classes might have different names but it’s still fairly legible).
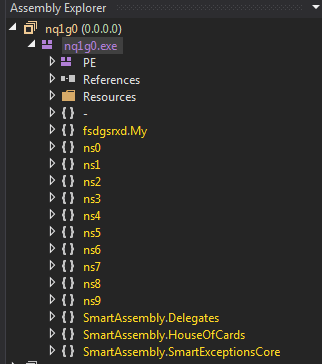
However, when we’re looking at the decompiled code and the names of the classes and functions, we can see that they don’t look right. They look like they were obfuscated:
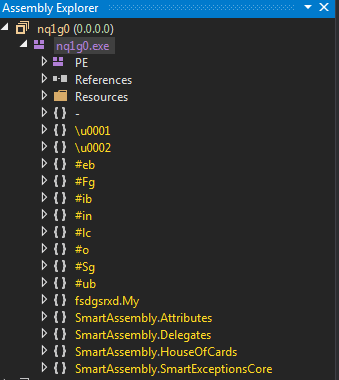
Obfuscated namespaces
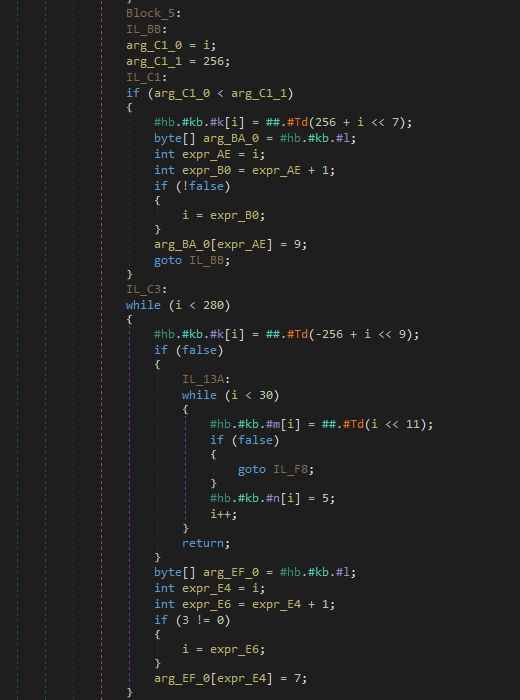
Obfuscated and packed code that doesn't make a lot of sense
Since .NET programs can be easily decompiled into something very close to their source codes, many developers (and malware authors) use all sorts of obfuscation solutions that make reverse engineering more complicated. Luckily, there are tools to help us deobfuscate the obfuscated.
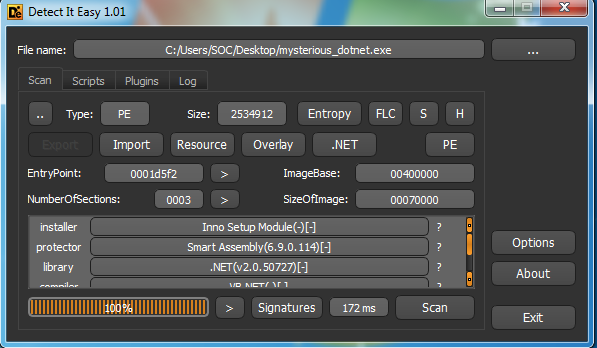
To make this de-obfuscation process simple, we’re using a tool called “detect it easy (die)”. Once we “drag” our file into die’s window, we can see some important information about the file, including details about the obfuscator that’s being used. In this case, it’s SmartAssembly.
After we know what was used to protect this file, we can start looking for ways to get around it. I recommend using de4dot, an open-source .NET deobfuscator and unpacker.
After quickly running de4dot, we can see that it unpacked and deobfuscated the malicious file:
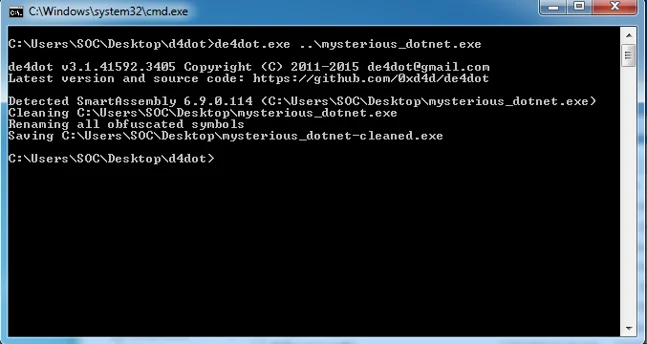
Now we have an unpacked and deobfuscated version of that mysterious malware sample.
Once we open that version with dnSpy, we can see that the namespaces are different and actually make a little bit of sense:
Important notes:
- These are not the original namespaces name. The deobfuscator gives the namespaces and other objects/symbols generic names for the sake of legibility. It has no way of knowing the original names specified by the author.
- The dropper was originally written in Visual Basic but since dnspy allows us to reflect the MSIL code back to both VB or C#, I chose C# because the syntax is easier to understand. All of the code snapshots that you see in this article are C# that was converted from the MSIL that was compiled form code that was originally written in VB.
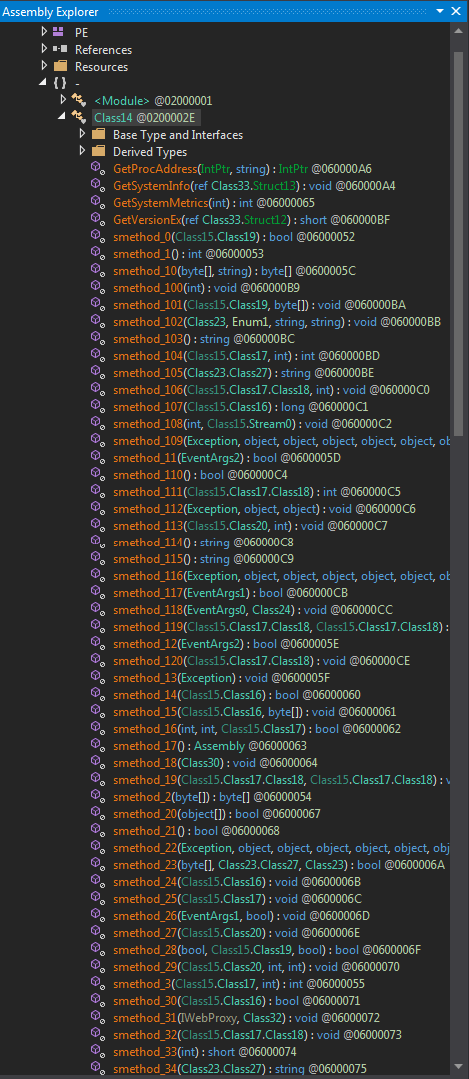
When we look inside the “-” namespace, we can see a class called “Class14” (again, named by the deobfuscator) and lots of class methods under it:
When looking at the code in Class14, we can clearly see some code that tries to enumerate an environment variable using the Interaction.Environ call:
We can clearly see that the environment variable is actually a string concatenation of two base64 obfuscated strings. When trying to de-base64 the strings, we get some blurb that we can’t really understand:

When looking at other parts of the code, we can see that its calling some crypto libraries and functions as well:

This sample contains a lot of spaghetti code that references other parts in classes in the code to make it hard for a researcher to perform static analysis on the code. At this point, it is fairly easy to understand that the base64 values are also encrypted. At that point we have to options:
- Static analysis - write some quick and dirty code that decrypts the strings using all the keys that are used in the code.
- Dynamic analysis - step through the execution process of the program using a debugger and see how the values are being decrypted and deobfuscated in front of our astonished eyes.
I’m definitely going with option number two here, mainly because debugging will be faster since the code is pretty legible and there’s no need to step through pesky assembly code.
Since dnSpy is also a debugger, it’s very easy to place a breakpoint where we want in the code by going to the appropriate line and hitting F9.

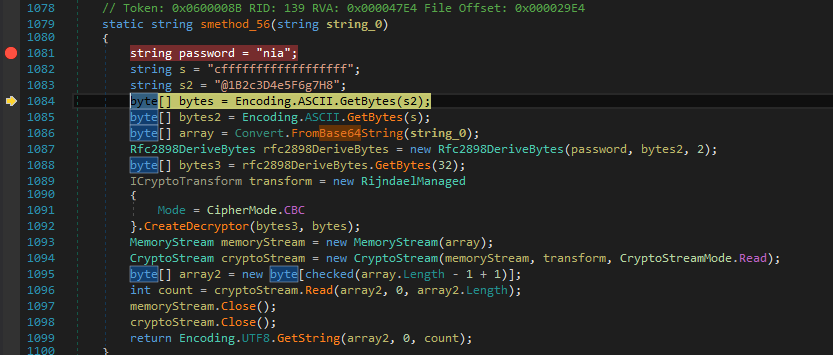
I placed a breakpoint in line 1081, which is the beginning of smethod_56(). As you can see, the function accepts one parameter - string_0 (Remember, the name of the string variable is generated by the decompiler).
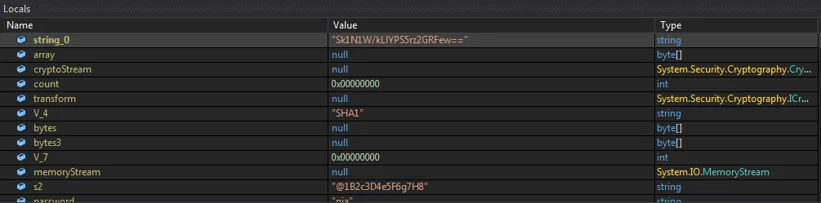
The string_0 is a base64 value (which doesn’t deobfuscate into something normal).
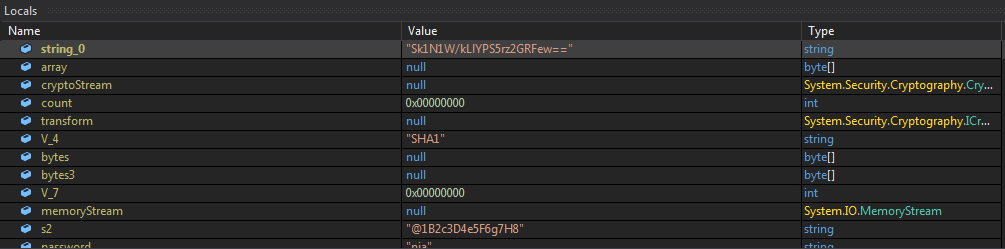
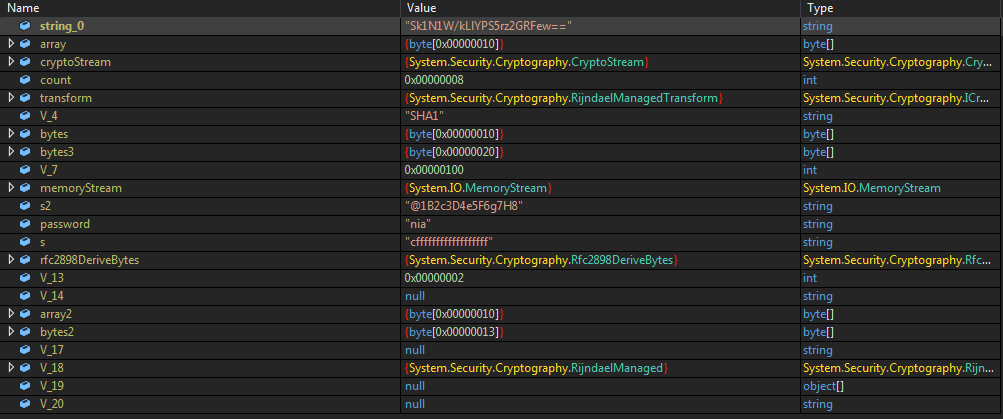
Note that as we step over the code (using F10) we can see the various objects populate with data:
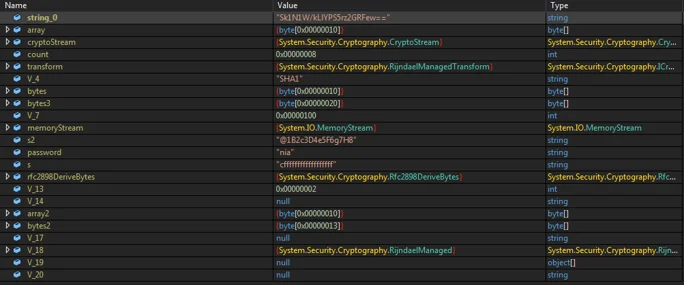
This makes understanding what smethod_56() does easy: it creates 3-byte arrays from three different variables:
- S2 (1B2c3D4e5F6g7H8)
- S (cffffffffffffffffff)
- String_0 (Sk1N1W/kLlYPS5rz2GRFew==)
It then instantiates the rfc2898DeriveBytes class and passes three parameters to it:
- Password (“nia” - you can see it in the code screenshot above) - used as a password
- Bytes2 (An array of bytes made out of the s variable) - used as a salt
- 2 - the number of iterations to derive the key from
The function then creates another byte array, bytes3, which contains the key that was just generated.
The function will continue to instantiate the RijndaelManaged class and will call the CreateDecryptor function with bytes3 and bytes as its parameters (key and IVs, respectively).
As we step over the code further, we can see that there are several obfuscated and encrypted strings that are being decrypted by calling (via delegation) smethod_0() with values that need to be deobfuscated and decrypted:

Once each value is deobfuscated and decrypted, we can see its decrypted value in the variable pane below:
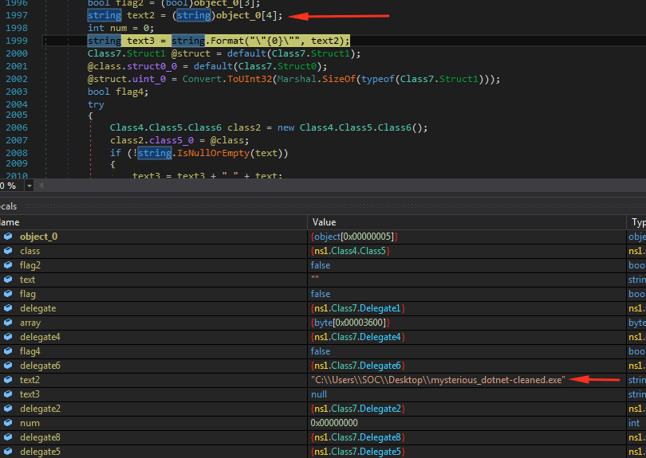
In this case, text2 is contains the full path to the executable (which is currently running) itself.
As we step over further into the code, we can see the other strings being deobfuscated and decrypted as well. These strings reveal more details about the behavior of this malware.
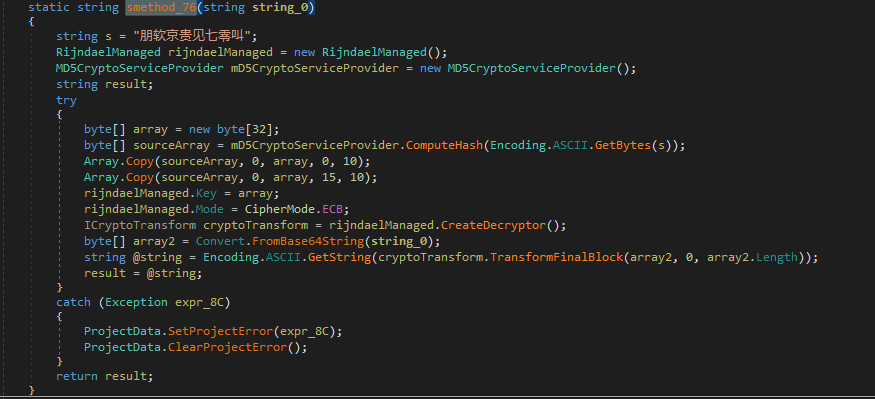
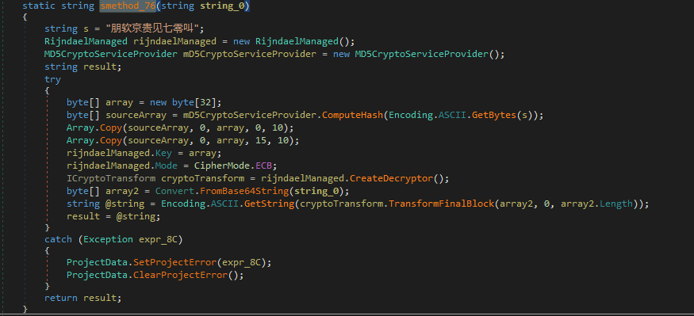
As we can see in this piece of code, several obfuscated/encrypted strings are being coupled and decrypted by a different (yet very similar) function, smethod_76() - notice the different encryption key in Chinese:

 Smethod_76
If we look at the variable pane again, we can see that more paths were decrypted. We can clearly see that sourceFileName stands for the original path of msbuild.exe and that destFileName contains the path to a file called svhost.exe in the user’s temp directory:

If we go back to the code, we can see that there is actually a file copy operation:

Which means that svhost.exe in the temp directory is actually MSBuild.exe. Since we are actively debugging this process, we could actually navigate to that path and inspect that file ourselves, and surprise surprise:
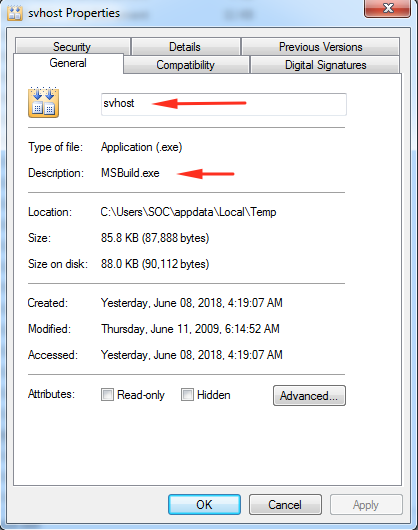
Svhost (which is actually msbuild) is going to be used to build a very small binary that will manipulate the following registry value in order to create persistence.
Process termination via injection:
Another interesting thing that this dropper does is terminate research tools. I noticed this while running Procmon and process hacker and right at the moment the debugger was executing line 2094 in class_14 I noticed that all of my research tools stopped working. This raised more interesting questions: what actually is going on here and how are the tools being closed?
Usually, when malware wants to close “research oriented” processes, it has a list of target applications (programs like Wireshark and sysinternals tools), polls the process list every n seconds and it simply calls TerminateProcess() if any of those processes are running.
In this case, the dropper was different, though. I couldn’t spot any direct or indirect (via GetProcAddress()) calls to TerminateProcess() in the code.
While debugging the malware, I noticed that ProcessHacker just quits and cannot be opened again until the malicious executable is terminated. This, of course, seemed to be some sort of mechanism to make performing any dynamic analysis of the malicious process difficult.
A common way of performing this trick would be to use the CreateToolHelp32Snapshot() function of the Windows API. This function will take a “snapshot” of a process along with its heap, modules and other information.
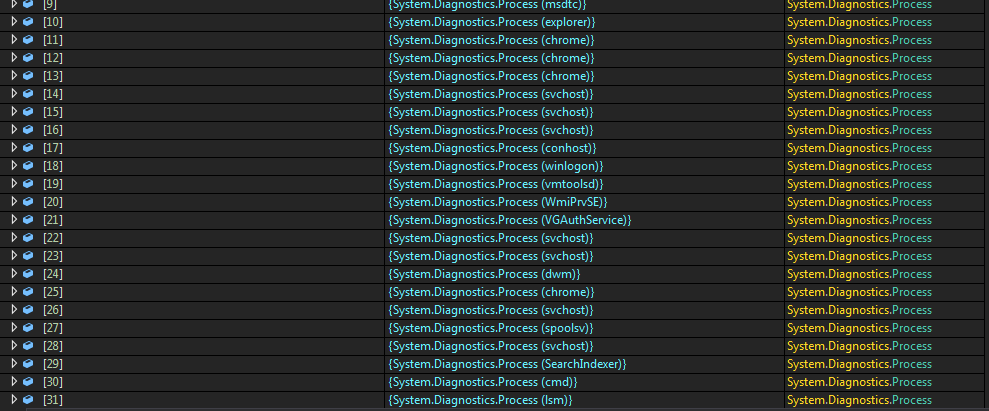
In our case, the dropper gets a list of all of the running processes and calls CreateToolHelp32Snapshot() on each and every one of the processes. The results will then be stored in an array. Each member of this array holds the information of a running process.
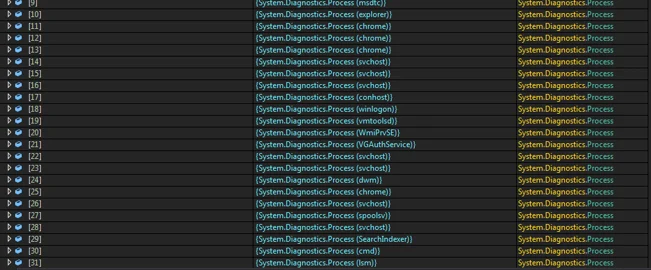 Enumerated processes in the array
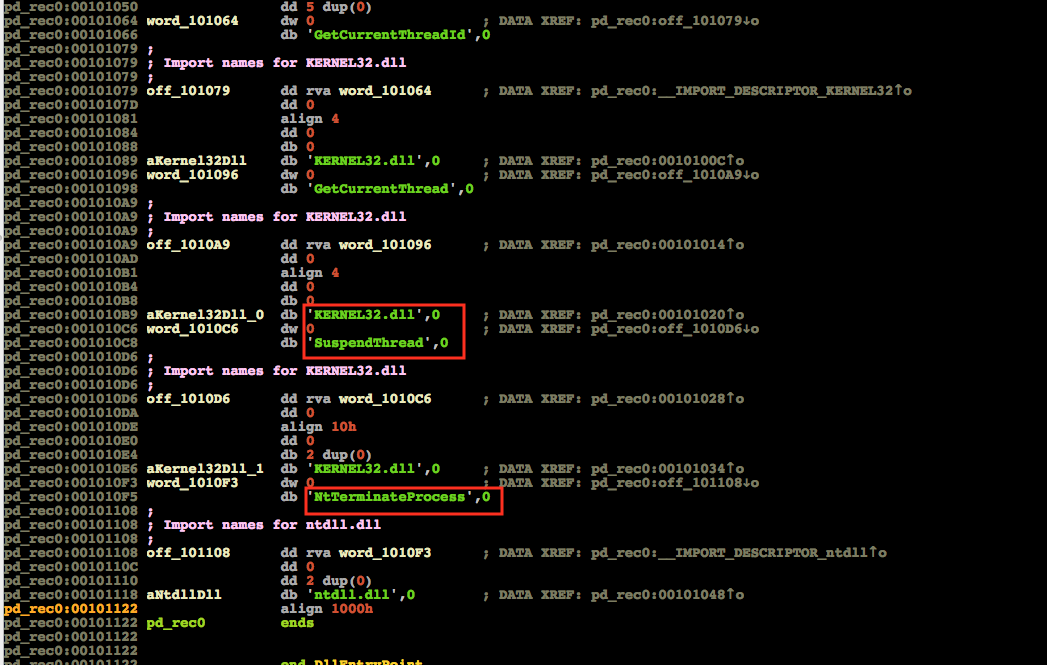
Once the relevant “research oriented process” was detected, the dropper will then decrypt the following code (which is hosted in the dropper itself), inject it to the the research tool’s process and will then execute it, terminating the research process by calling NtTerminateProcess().
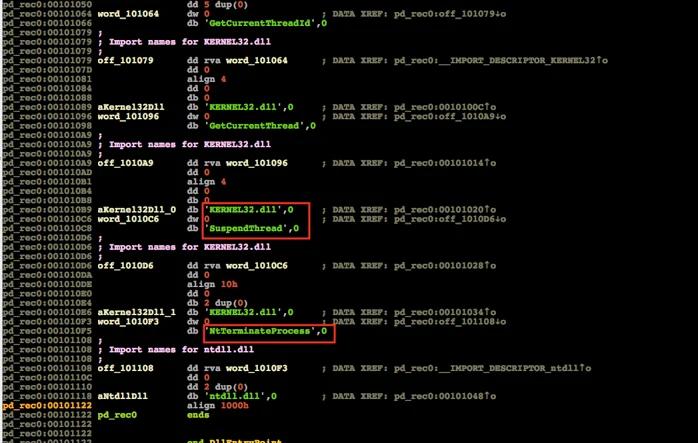 Process terminating code
This concludes the first part of this research. We’ve covered how to approach such a reverse engineering project, went over the tools and techniques that we need to apply in order to understand what is going on and answered two very important questions: how and why are research tools terminated by this malware.
In the next part, we’ll cover what this dropper is actually dropping and what we can figure out by performing static analysis on the dropped file.